
Self-Hosting Courselit: My Journey to a Sovereign and Free Teachable Alternative

1. Introduction
I recently decided to set up a home lab, motivated by a desire to have control over my data as well as a desire to learn and experiment. I set up an infrastructure that would allow me to host my data at home to cut down on certain subscription costs, and after taking the time to implement a backup strategy and stabilize my home lab, I figured it was time to get the most out of it.
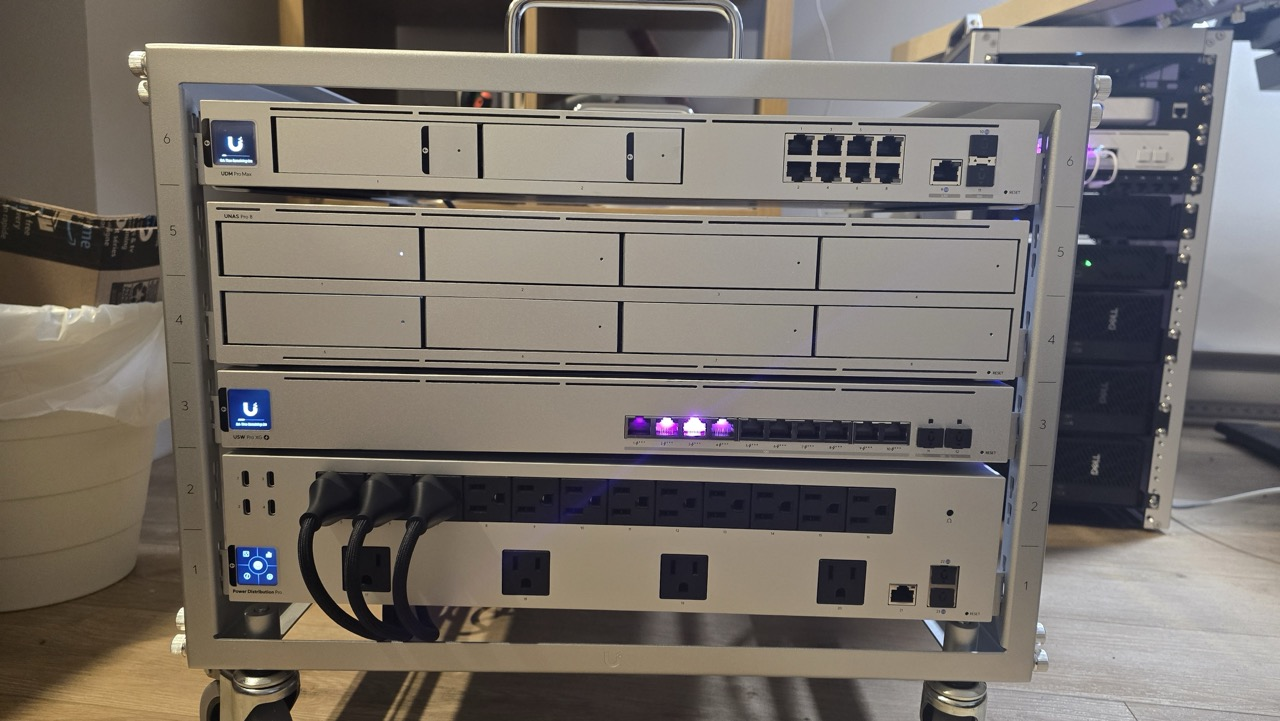
With several terabytes of storage and a Kubernetes cluster, I began exploring the possibility of hosting an LMS (Learning Management System) to avoid the exorbitant prices of proprietary LMS platforms like Podia or Teachable. That’s when I discovered Courselit, an open-source LMS that I could host myself to learn Kubernetes and make the most of my infrastructure. In this article, I’ll try to explain, step by step, the process I went through to host Courselit — the platform on which you’re currently reading this article.
Note : To fully understand what follows, you should have some familiarity with Kubernetes and containerization, as I will be referring to concepts related to these topics.
2. What's Courselit
CourseLit is an all-in-one platform for creating, selling and marketing digital products such as courses, memberships and downloads. It was developed in response to the high costs and limitations of traditional course builders and LMS platforms such as Teachable, Thinkific and Podia.
CourseLit is fully open-source and self-hostable, enabling you to host your educational empire at zero licence cost. You can host it directly on your own infrastructure or on an existing platform, such as DigitalOcean or AWS. In this article, I will demonstrate the process I have followed to self-host CourseLit on my Kubernetes cluster.
3. Architectures
3.1 Courselit in my Home lab
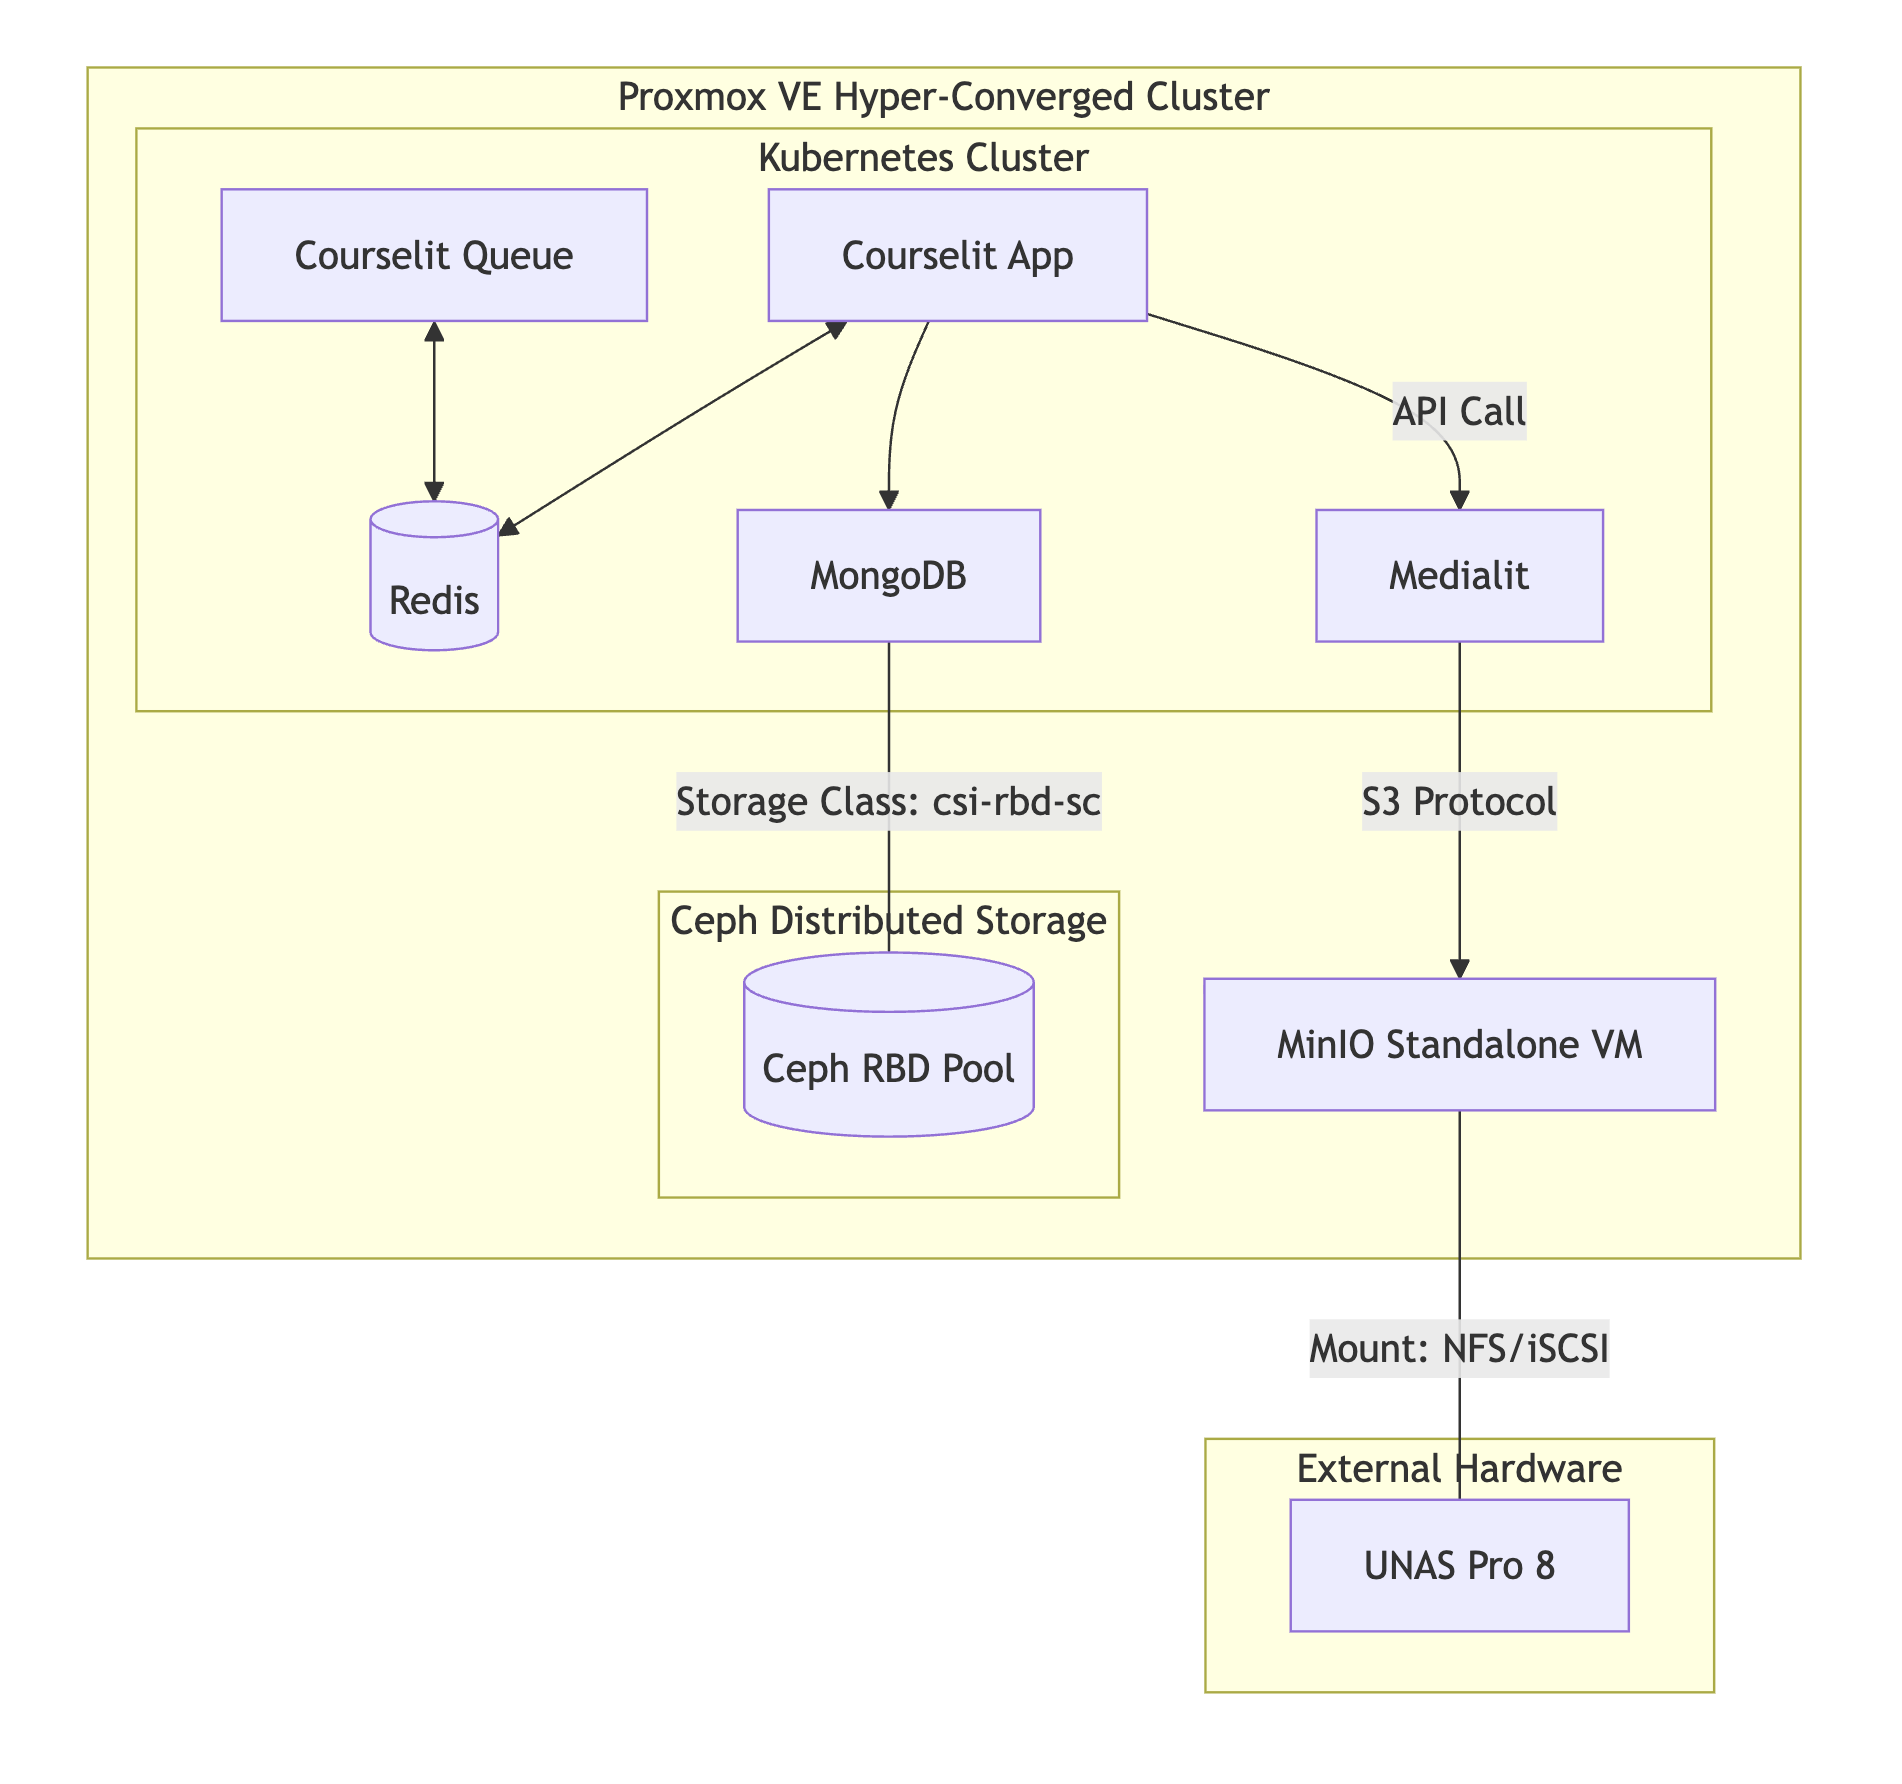
The simplified architecture of my home lab looks like this. As you can see, the Kubernetes cluster is nothing more than VMs in a Proxmox cluster. Instead of paying for an Amazon S3 bucket, I decided to self-host my own S3 instance on a VM located on my Proxmox Cluster using Minio, which is also an open-source project that you can self-host if you want an open-source S3 alternative. All Minio data is stored on a UNAS PRO 8, which is a NAS with 192 TB of storage. The experts will tell me if it’s a wise choice to store Minio data on the NAS rather than on Ceph.
3.2 Courselit in Kubernetes
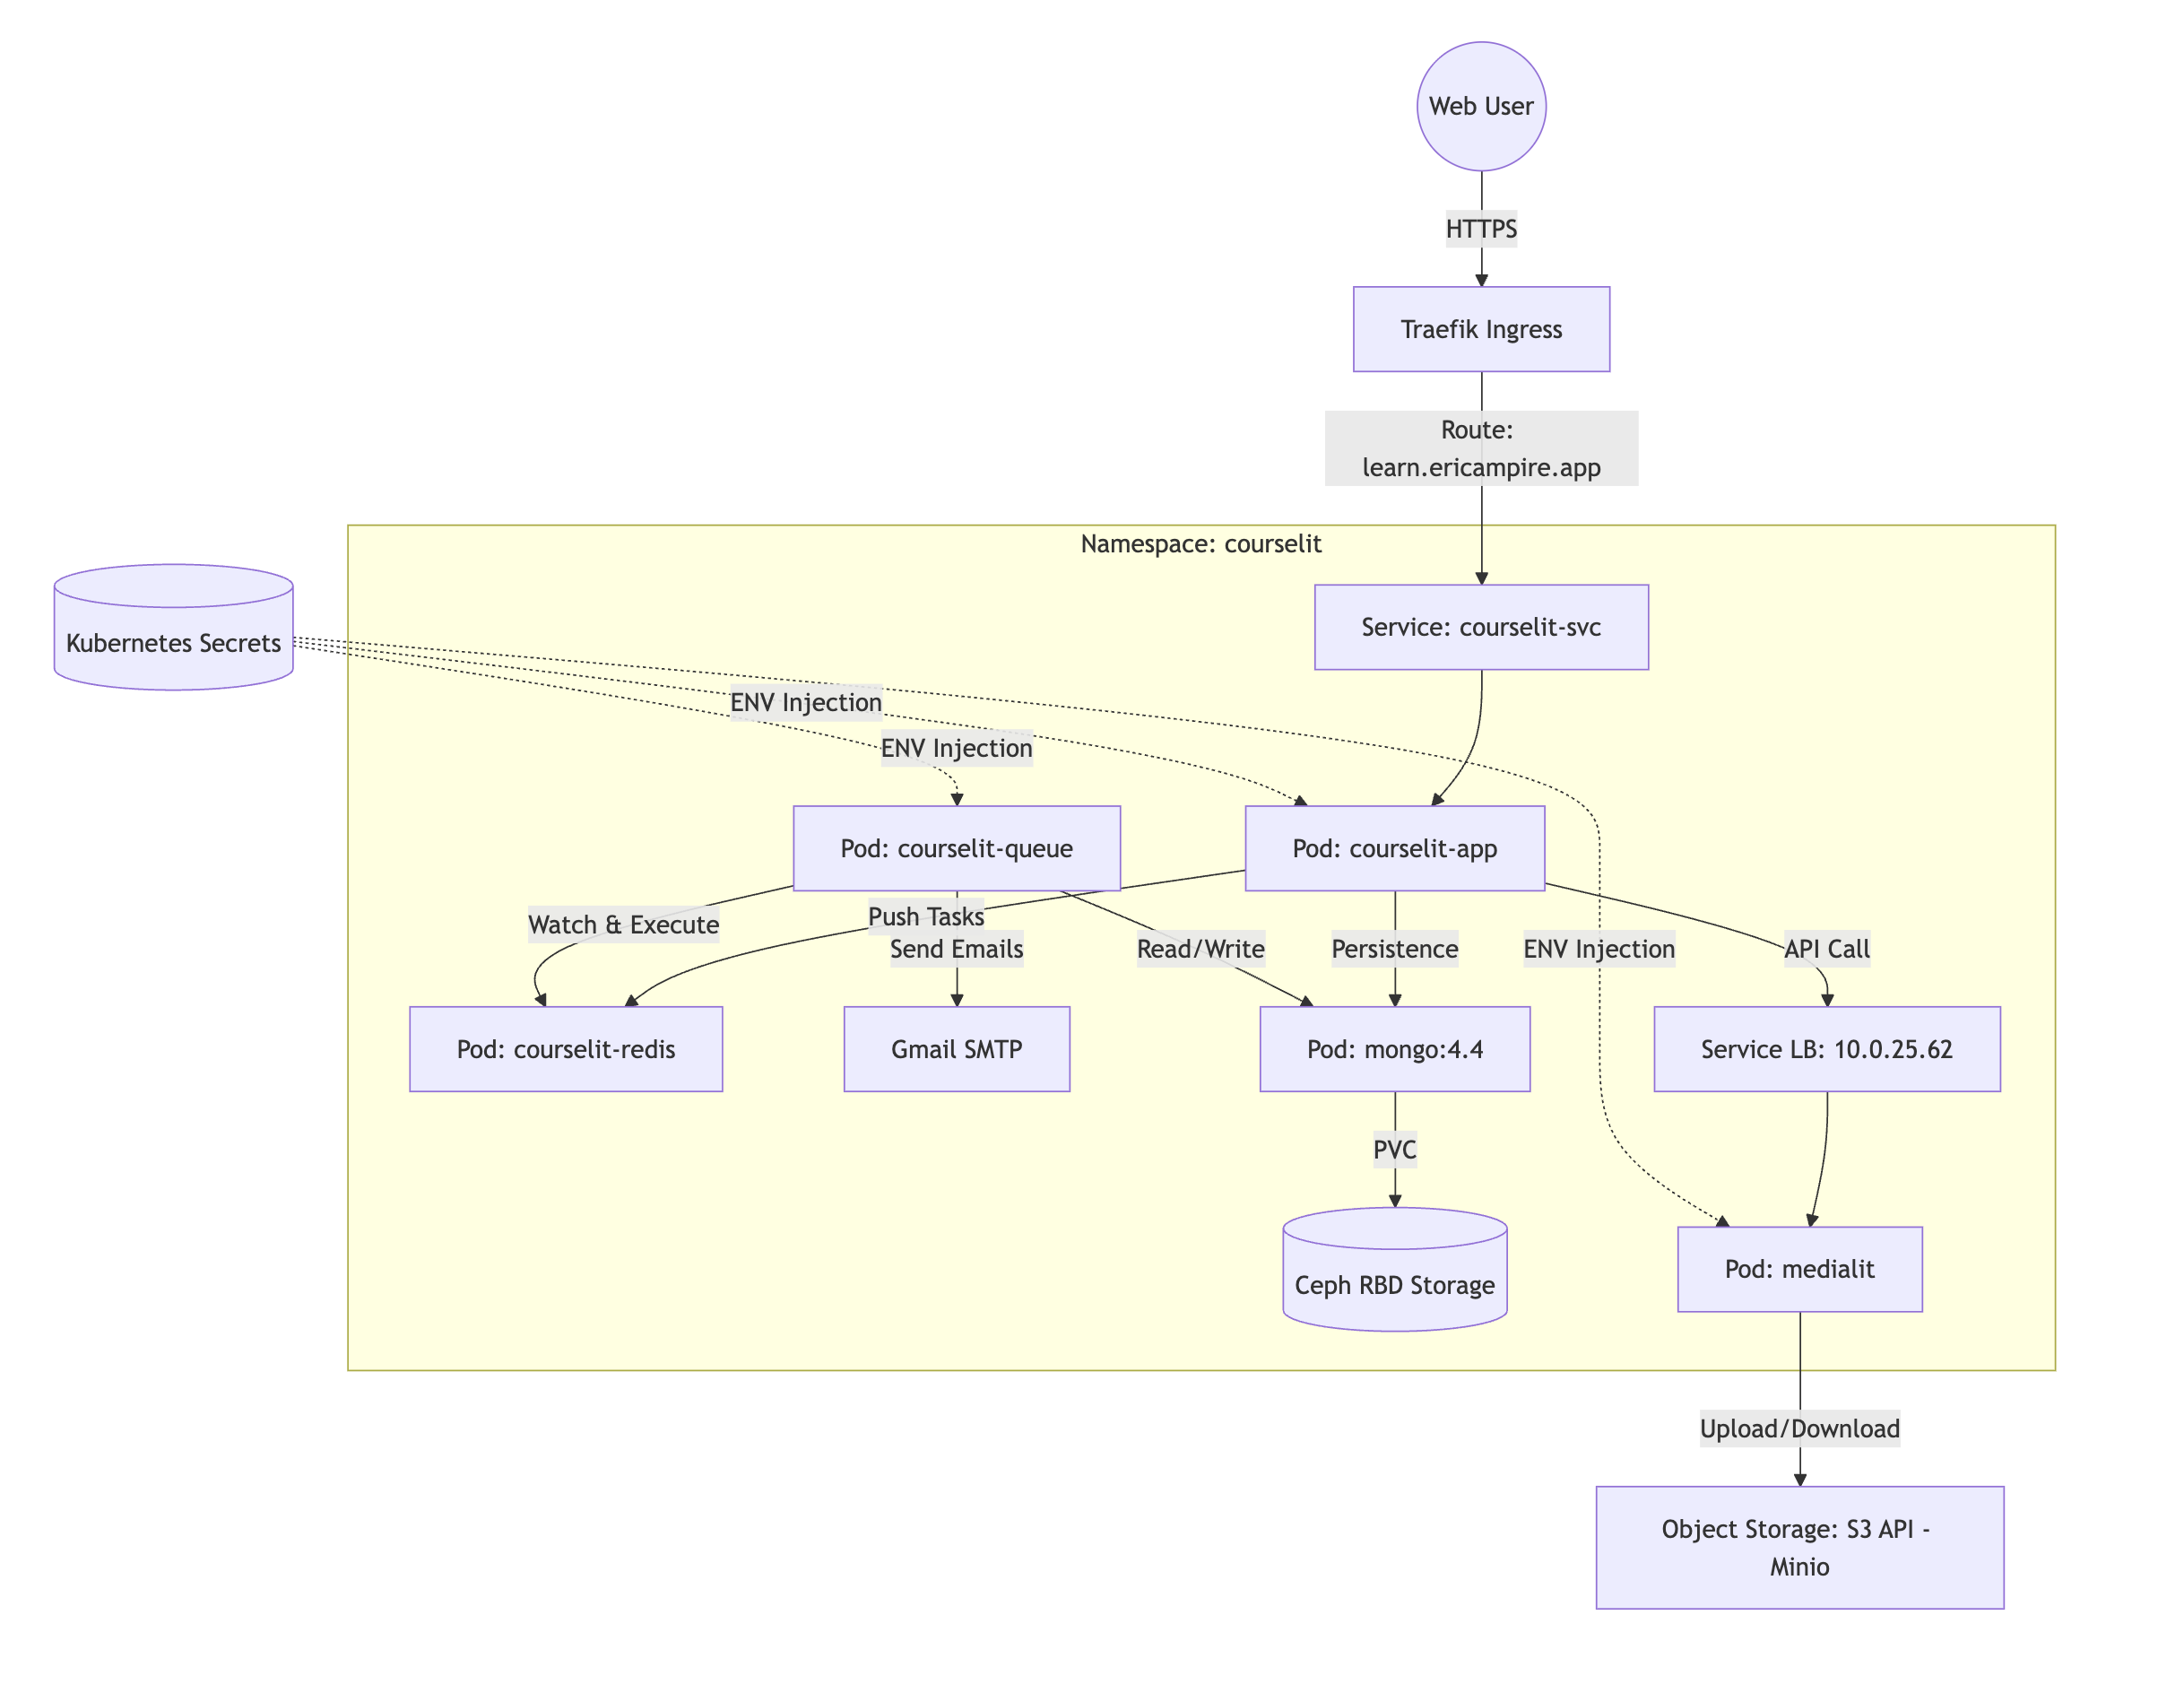
To get Courselit up and running, you need to connect a number of components to each other. I think this diagram provides a good overview of how the various components are connected, and I’ll explain each one in detail.
4. Deployment
The easiest way to deploy Courselit is to do so using Docker, since all the components mentioned above have a Docker image. In fact, the official Courselit documentation only covers deployment via Docker. Since I wanted to learn Kubernetes, I thought it would be interesting to deploy Courselit on a Kubernetes cluster.
4.1 Courselit Deployment
The first component to deploy is the Courselit app; this is the core component, the one that serves as the LMS, and it needs to store its data in a database — in this case, we’re using MongoDB. Courselit also needs to communicate with Redis for caching and all the queueing features, which I’ll explain later.
So, in total, I have three components — or rather, three images — to deploy in Kubernetes: CourselitApp, Redis, and Mongo.
Since we’re using Kubernetes, I’ll not go into detail about how Kubernetes runs applications, but basically, we need to create deployments for these three images.
4.2 What's a Kubernetes Deployment
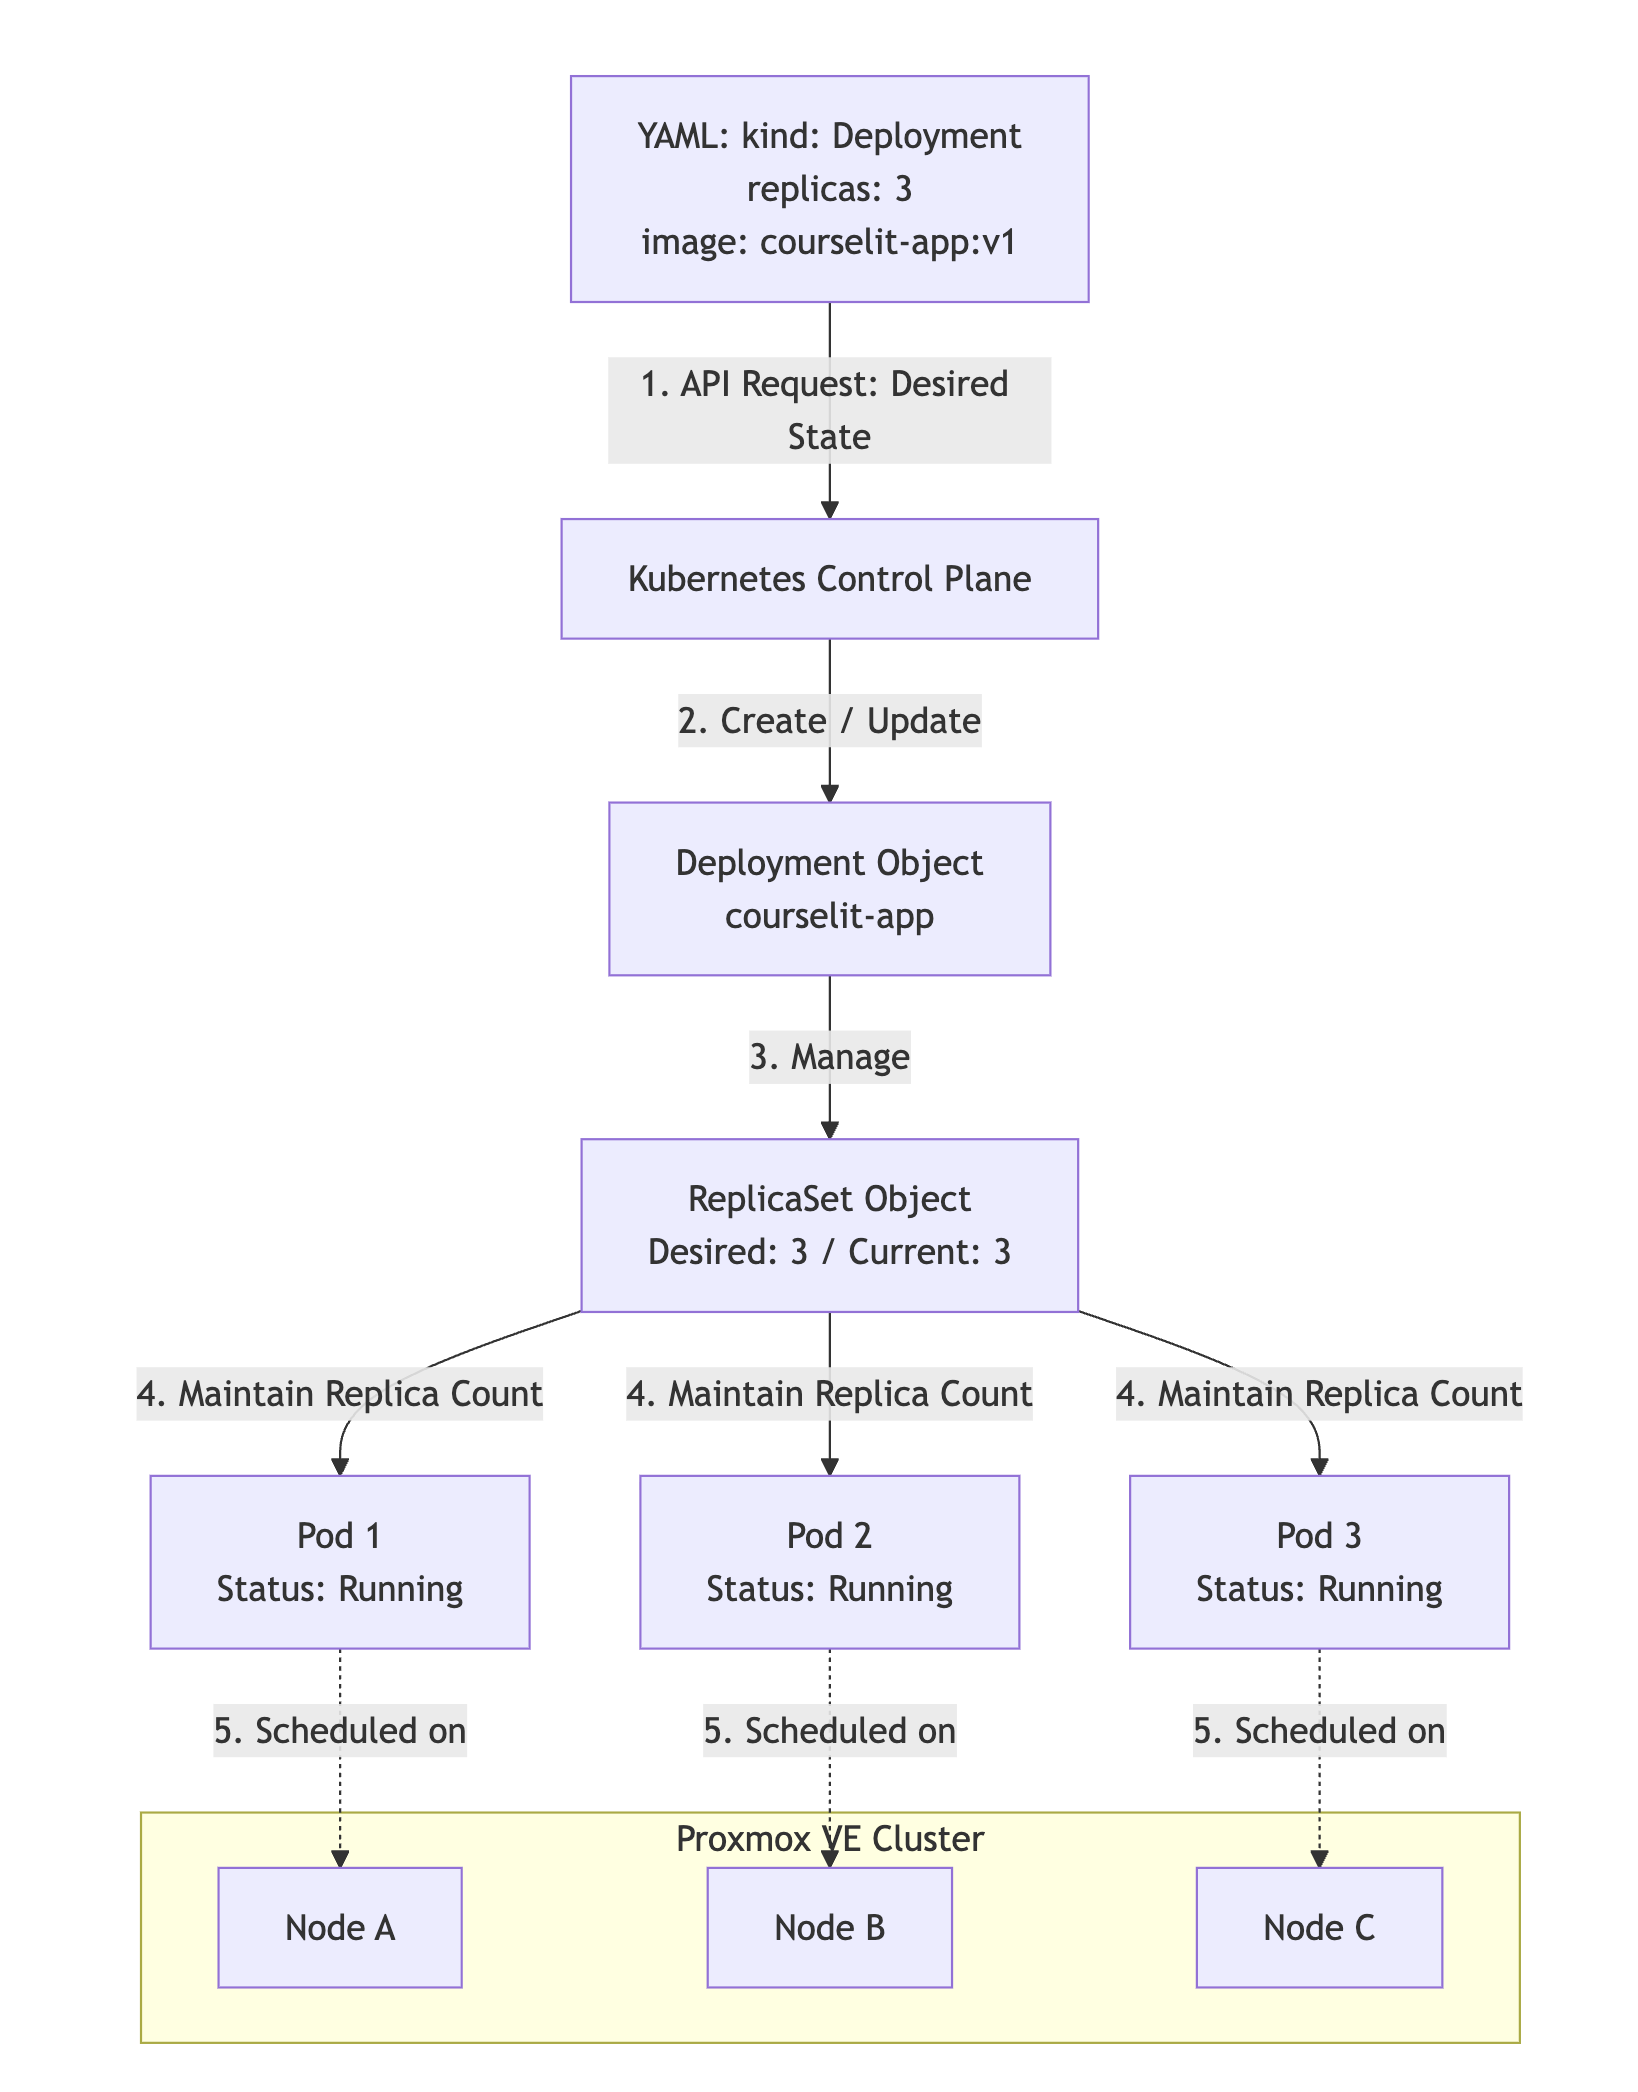
In the world of Kubernetes (K8s), a Deployment is an object (a resource) used to describe the desired state of your application.
Think of it as a “conductor”: you don’t tell it how to start each container one by one; you give it a set of instructions (the YAML), and it ensures that reality always matches your instructions.
What does this actually do?
Deployment manages three vital functions for your applications like Courselit:
- Self-healing: If you tell Deployment, “I want 3 replicas (copy) of my application,” and a Proxmox node goes down, Deployment will detect that only 2 remain and will automatically restart the 3rd one on another node.
- Rolling Updates: When you update your Docker image version, Deployment doesn’t shut everything down all at once. It launches the new version, waits for it to be ready, then shuts down the old one. Your users won’t experience any downtime.
- Rollback: If you deploy a buggy version, you can tell the Deployment to instantly revert to the previous version.
The hierarchy: Deployment > ReplicaSet > Pod
It’s important to understand that the Deployment doesn’t create containers directly. It uses layers:
- The Deployment: Manages versions and update strategies.
- ReplicaSet: (Created by the Deployment) Ensures that the correct number of copies (replicas) are running.
- Pod: The basic unit that contains your container (e.g., your courselit.js app).
4.3 Deploy Courselit on Kubernetes
Now that you know what a deployment is, let’s take a look at what the deployment—or rather, the YAML description of the deployment—for Courselite-App, MongoDB, and Redis looks like.
4.3.1 Courselit App deployment
As you can see, the minimal deployment of Courselit looks like this. As with Docker, we have to define the container image and the container port. However, here we have used an emptyDir because the Courselit data will be stored elsewhere, in MongoDB.
apiVersion: apps/v1
kind: Deployment
metadata:
  name: courselit
  namespace: courselit
spec:
  selector:
    matchLabels:
      app: courselit
  template:
    metadata:
      labels:
        app: courselit
    spec:
      containers:
        - name: courselit
          image: codelit/courselit-app:latest
          ports:
            - containerPort: 3000
          volumeMounts:
            - name: next-cache
              mountPath: /app/apps/web/.next/cache
      volumes:
        - name: next-cache
          emptyDir: {}
values.yaml
To make Kubernetes launch the application you need to saved this yaml file and apply it
kubectl apply -f courselit-app.yamlRight now there’s no point in applying this yaml file because it’s incomplete. At the end of the article, we’ll combine all the elements into a single file that can be deployed directly.
4.3.2 MongoDB deployment
The second deployment we need is for MongoDB; its structure is somewhat similar to the first one, but the difference here is that this deployment points to a different image (mongo:4.4), runs on port 27017, and in the volumes section, we use a PersistentVolumeClaim.
In the Kubernetes world, a PVC (Persistent Volume Claim) is a request for permanent storage that a user submits to Kubernetes to ensure that their data survives even if the Pod is deleted or moved.
apiVersion: apps/v1
kind: Deployment
metadata:
  name: courselit-mongo
  namespace: courselit
spec:
  strategy:
    type: Recreate
  selector:
    matchLabels:
      app: courselit-mongo
  template:
    metadata:
      labels:
        app: courselit-mongo
    spec:
      containers:
        - name: mongo
          image: mongo:4.4
          env:
            - name: MONGO_INITDB_ROOT_USERNAME
              value: "root"
            - name: MONGO_INITDB_ROOT_PASSWORD
              value: "example"
          ports:
            - containerPort: 27017
          volumeMounts:
            - name: data
              mountPath: /data/db
      volumes:
        - name: data
          persistentVolumeClaim:
            claimName: courselit-mongo-pvc
The MongoDB PVC look like this, Basically, we asked Kubernetes to set aside 10 GB for us
apiVersion: v1
kind: PersistentVolumeClaim
metadata:
  name: courselit-mongo-pvc
  namespace: courselit
spec:
  accessModes: [ReadWriteOnce]
  storageClassName: csi-rbd-sc
  resources:
    requests:
      storage: 10Gi
4.3.3 Redis deployment
Another deployment we need is Redis; it uses the redis:6-alpine image and runs on port 6370
apiVersion: apps/v1
kind: Deployment
metadata:
  name: courselit-redis
  namespace: courselit
spec:
  selector:
    matchLabels:
      app: courselit-redis
  template:
    metadata:
      labels:
        app: courselit-redis
    spec:
      containers:
        - name: redis
          image: redis:6-alpine
          ports:
            - containerPort: 6379
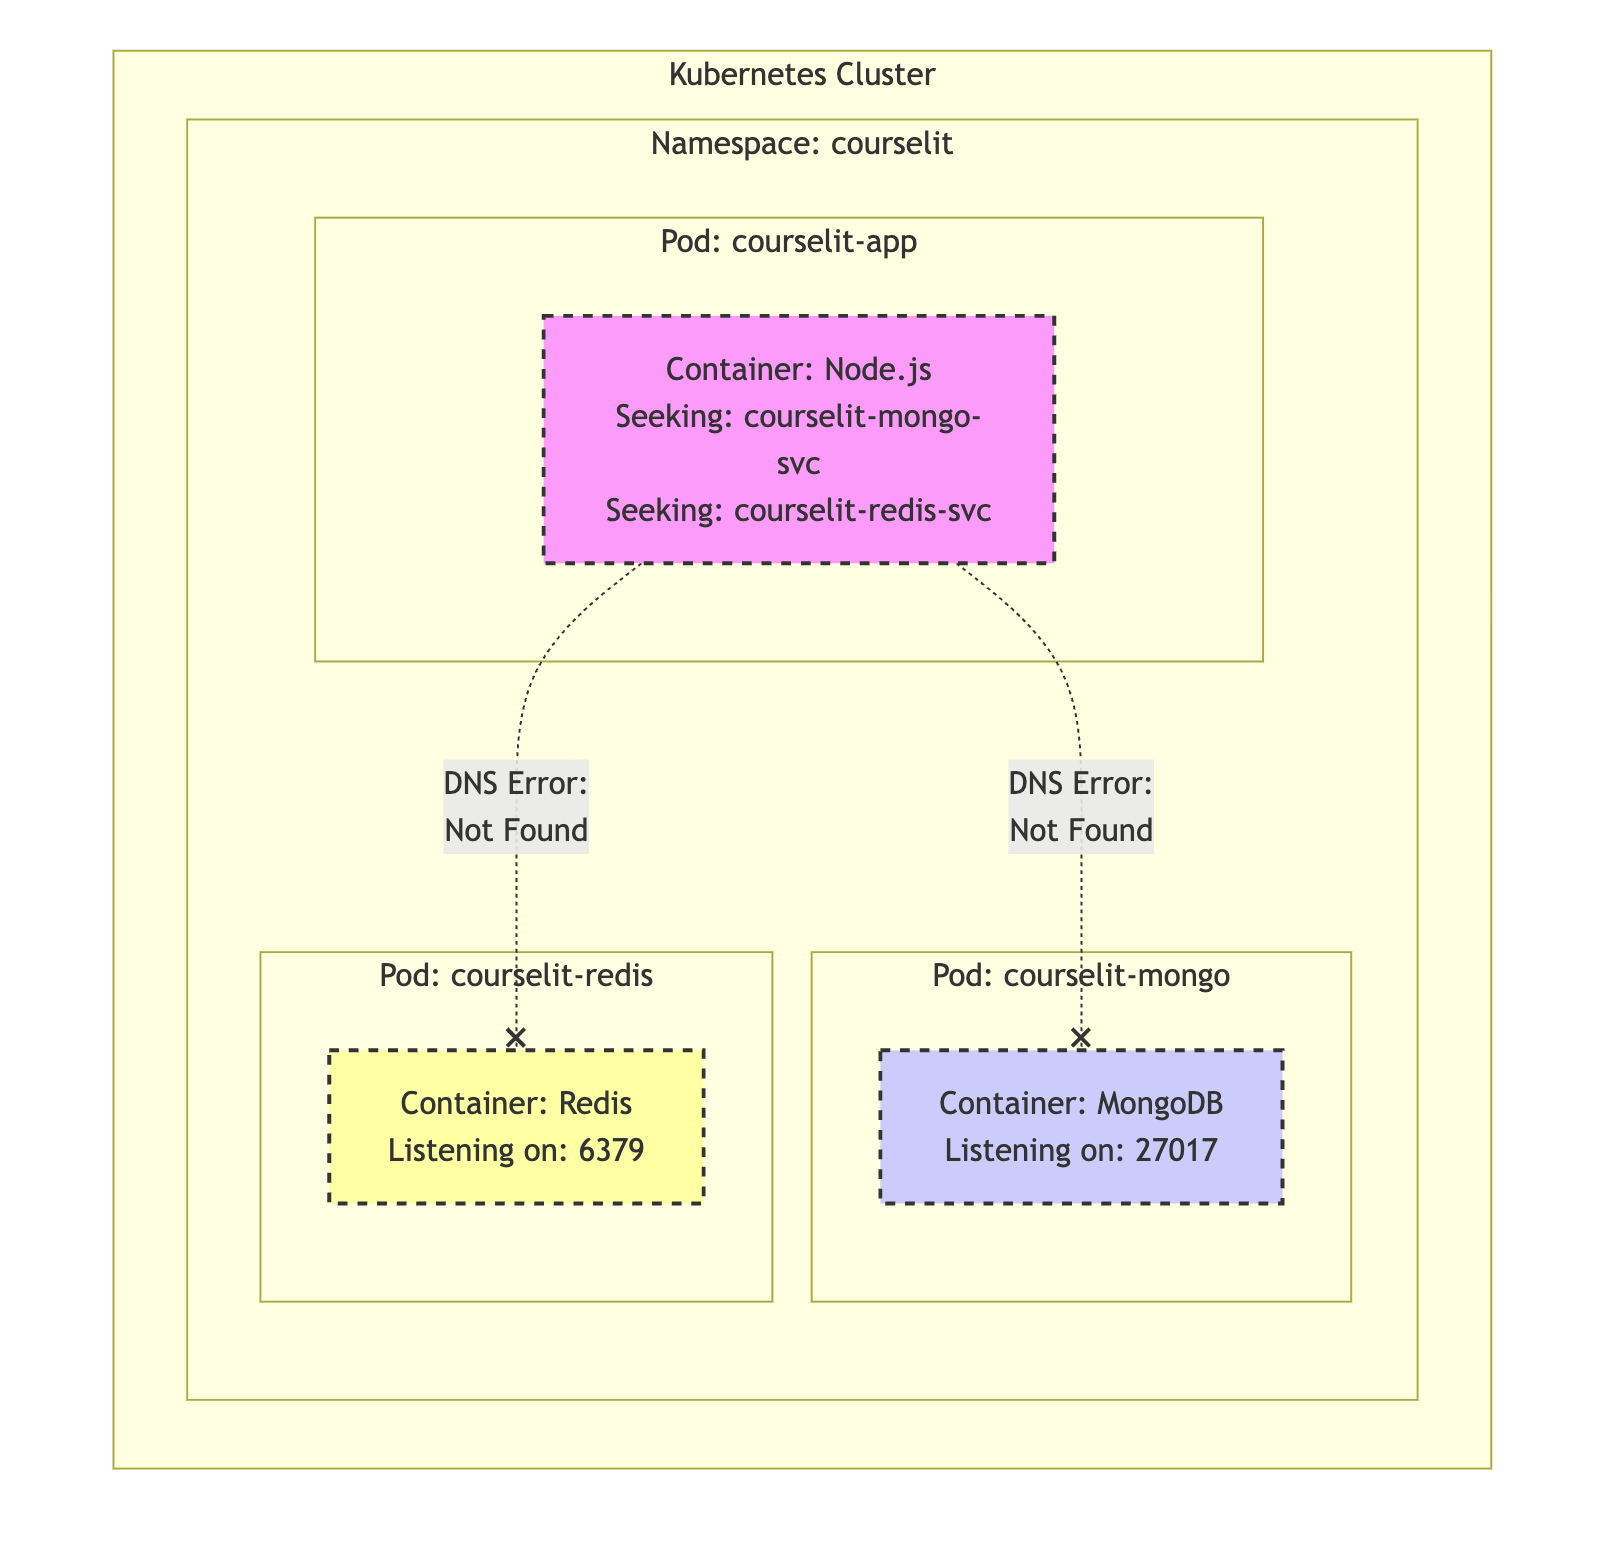
We have three deployments here, but the problem is that if we deploy them, each one will run in isolation without knowing how to communicate with the others. That’s why we need a service for each deployment.
4.3.4 Kubernetes Services
A Service in Kubernetes is a fixed network address (IP and DNS name) that directs traffic to a group of Pods, so your applications can communicate with each other without worrying about the fact that Pods are constantly changing their IP addresses.
Why is this essential ?
Pods are “ephemeral”: if they crash or if you update your app, Kubernetes destroys them and creates new ones with new IP addresses. If the Courselit application tried to contact MongoDB via its direct IP, the connection would break all the time.
The Service acts as a stable gateway:
- Stable IP: The service has an IP address that never changes.
- Load Balancing: If you have 3 copies of your app, the Service distributes requests among them.
- Service Discovery: You can contact your database simply by its name (e.g., courselit-mongo-svc) instead of an IP address.
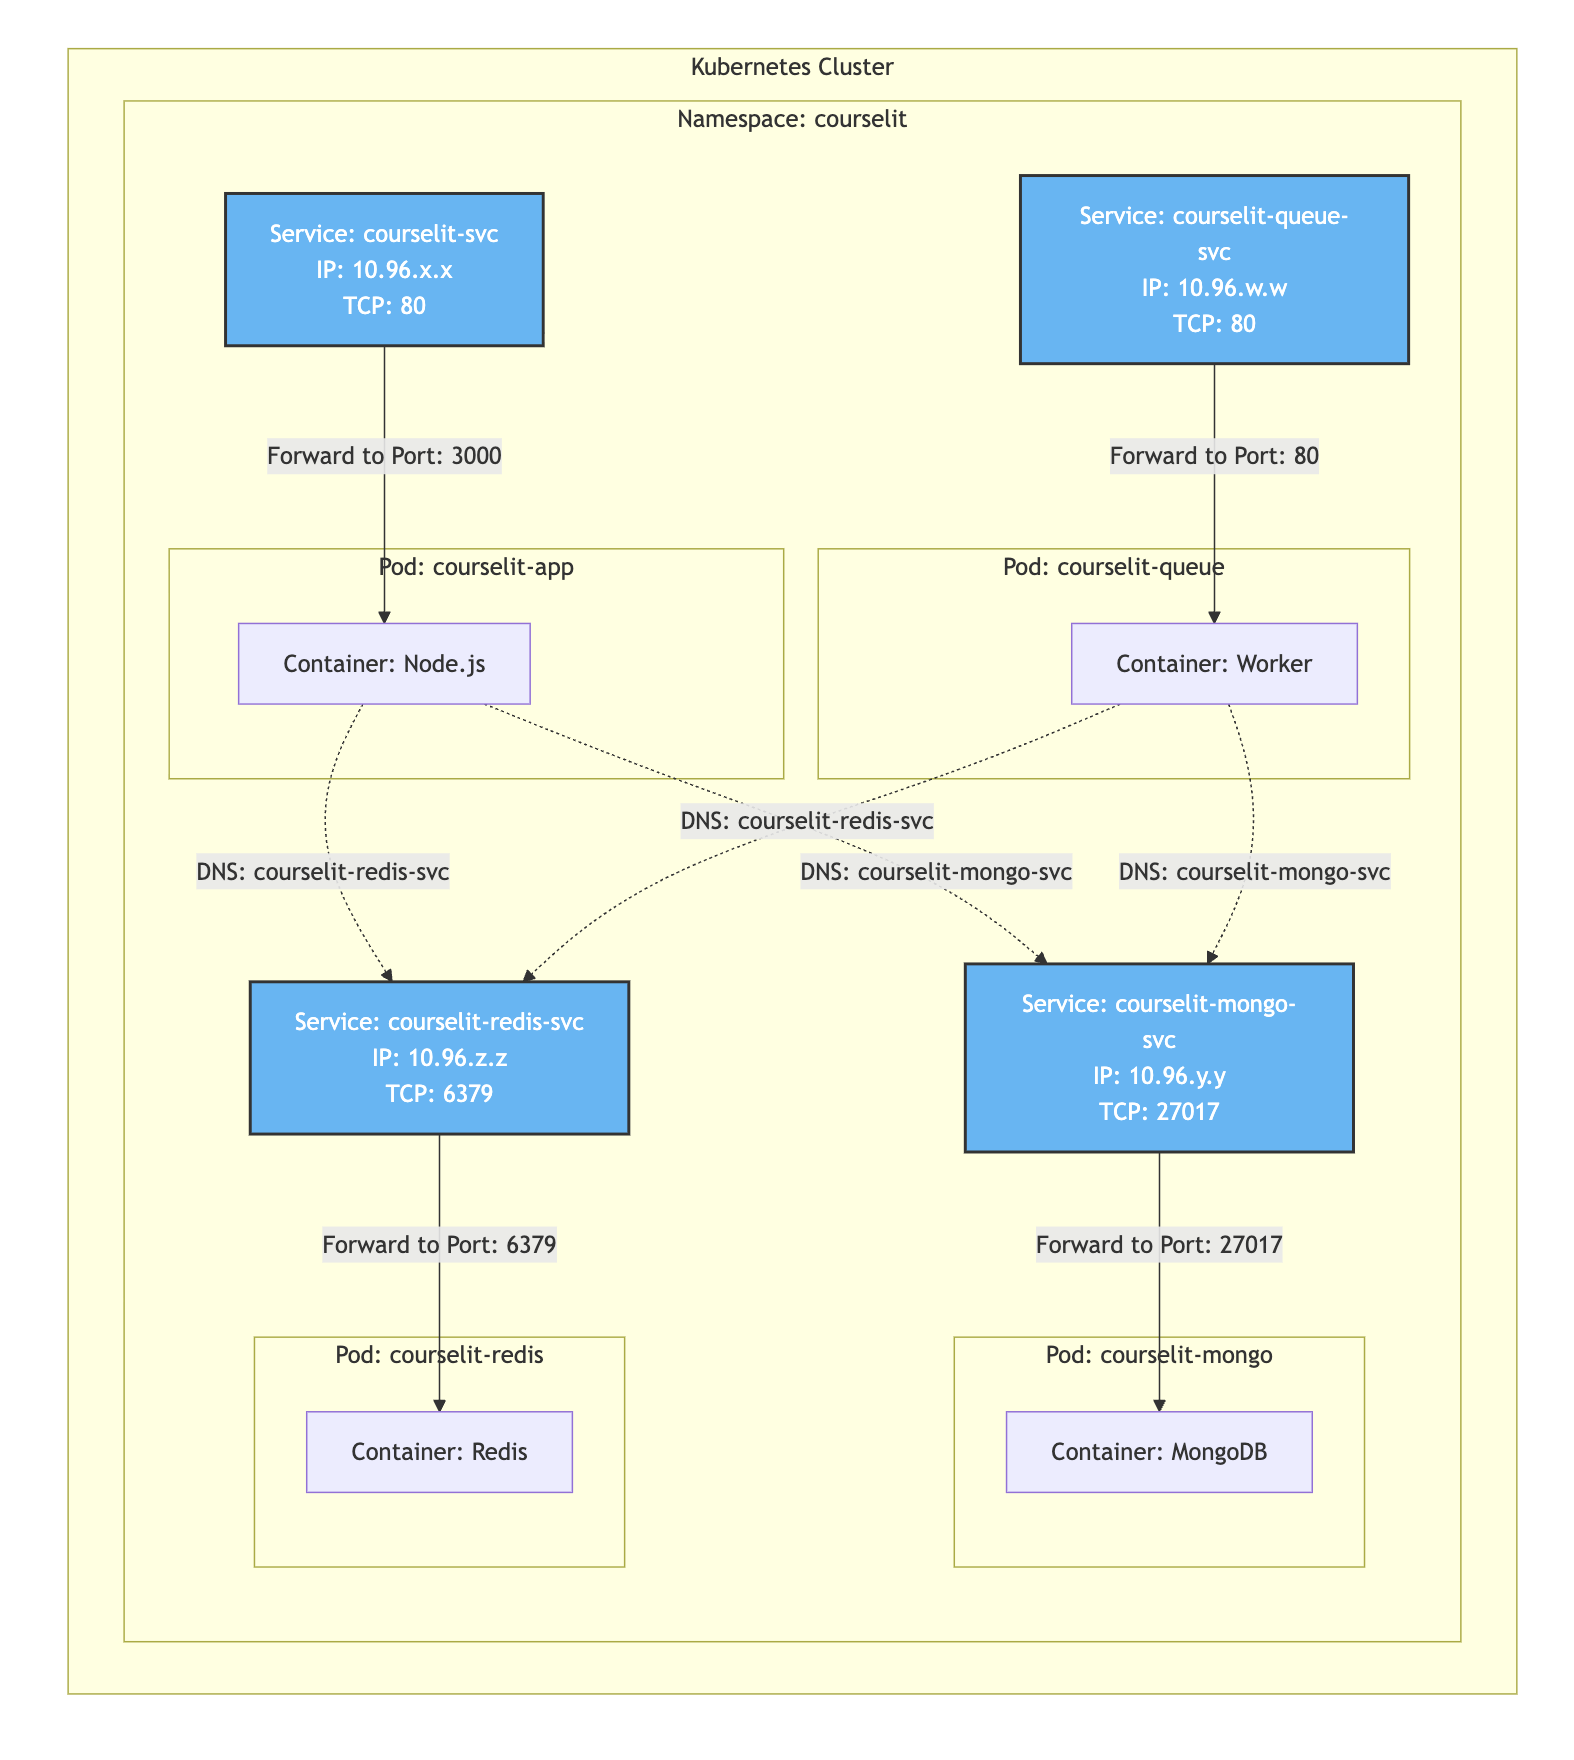
So, for our three deployments, we'll need three services that allow them to communicate with each other, and the services look like this
# Courselit Service
apiVersion: v1
kind: Service
metadata:
  name: courselit-svc
  namespace: courselit
spec:
  selector:
    app: courselit
  ports:
    - port: 80
      targetPort: 3000
---
# MongoDB Service
apiVersion: v1
kind: Service
metadata:
  name: courselit-mongo-svc
  namespace: courselit
spec:
  ports:
    - port: 27017
  selector:
    app: courselit-mongo
---
# Redis Service
apiVersion: v1
kind: Service
metadata:
  name: courselit-redis-svc
  namespace: courselit
spec:
  ports:
    - port: 6379
  selector:
    app: courselit-redis
---
As you can see, each service has a defined name in the metadata section and a selector that associates it with a deployment and specifies the port through which the service will expose the application to the outside world within the cluster.
For example, other applications can communicate with MongoDB using the service name courselit-mongo-svc.
4.3.5 Courselit Queue Deployment
Another important component shown in the first diagram is Courselite Queue. As you know, Courselite allows you to send emails, and this is made possible by Courselite Queue.
As you can see, this deployment is similar to the previous one, with the difference being that it includes many envvariables that will allow it to communicate with the components.
For Courselite-Queue (the worker) to function properly, it needs its two “right-hand men”:
- Redis : This is its trigger. Without Redis, the worker doesn’t know there’s work to be done. It listens to Redis to find out when a new task (such as sending an email) is posted.
- MongoDB : This is its memory. Once it has received a task, it often needs to read or modify information in the database (for example, marking a lesson as completed or verifying a user’s email address).
In this YAML, you can see this here:
- REDIS_HOST: “courselit-redis-svc” for real-time communication.
- DB_CONNECTION_STRING : “mongodb://...” For accessing persistent data.
This is a standard configuration for a “Producer-Consumer” architecture: Courselit App produces messages in Redis, and Courselit Queue consumes them using MongoDB.
apiVersion: apps/v1
kind: Deployment
metadata:
  name: courselit-queue
  namespace: courselit
spec:
  selector:
    matchLabels:
      app: courselit-queue
  template:
    metadata:
      labels:
        app: courselit-queue
    spec:
      containers:
        - name: queue
          image: codelit/courselit-queue:latest
          env:
            - name: NODE_ENV
              value: "production"
            - name: REDIS_HOST
              value: "courselit-redis-svc"
            - name: DOMAIN
              value: "learn.ericampire.app"
            - name: DB_CONNECTION_STRING
              value: "mongodb://root:example@courselit-mongo-svc:27017/courselit?authSource=admin"
            - name: COURSELIT_JWT_SECRET
              value: "votre_secret_jwt_ici"
            - name: PIXEL_SIGNING_SECRET
              value: "votre_secret_pixel_ici"
            - name: EMAIL_HOST
              value: "smtp.gmail.com"
            - name: EMAIL_PORT
              value: "465"
            - name: EMAIL_USER
              value: "youremail@gmail.com"
            - name: EMAIL_PASS
              value: "your password"
As you can see, courselit-queue is capable to talk to redis and mongodb using the name of their services
In order for Courselit to be able to send emails, you need to set up a mail server. In my case, I used my Gmail account since I don't have a dedicated mail server. You can generate the password using the link here
Like the other deployment courselit-queue also need a service to interact with the other components
# Courselit-Queue Service
apiVersion: v1
kind: Service
metadata:
  name: courselit-queue-svc
  namespace: courselit
spec:
  ports:
    - port: 80
      targetPort: 80
  selector:
    app: courselit-queue
We now have four pods that can communicate with each other.
4.3.6 Media Storage
In Courselit, you'll need to save files, images, and other media—that's where Medialit comes in, because obviously we don't store our files in MongoDB,
What's Medialit ?
Medialit is a specialized microservice within the Courselit ecosystem designed specifically for media management. In our current Kubernetes architecture, it acts as a "storage proxy" or an abstraction layer between our main application and the physical storage.
Here is a technical breakdown of what it does:
- The S3 Bridge
Medialit provides an S3-compatible interface. While your files eventually end up on the UNAS Pro 8, the main Courselit app doesn't talk to the NAS directly. Instead, it sends an API request to Medialit, which then handles the upload to your MinIO VM using the S3 protocol.
2. Decoupling Logic from Storage
By using Medialit, the main application doesn't need to know where or how files are stored (whether it's on-premise MinIO, AWS S3, or Google Cloud Storage). If you ever decide to move your videos from your home lab to the cloud, you only need to update the configuration in Medialit, and the rest of your cluster stays the same.
3. Key Responsibilities
- File Uploads/Downloads: Managing the stream of data between the user and the storage backend.
- Security & Authentication: Using API keys (like the
MEDIALIT_APIKEYin your YAML) to ensure only authorized services can upload media. - Path Management: Organizing how files are structured (e.g., using the
CLOUD_PREFIX: "media"setting you have).
The medialit deployment looks like this
apiVersion: apps/v1
kind: Deployment
metadata:
  name: medialit
  namespace: courselit
spec:
  selector:
    matchLabels:
      app: medialit
  template:
    metadata:
      labels:
        app: medialit
    spec:
      containers:
        - name: medialit
          image: codelit/medialit:latest
          env:
            - name: PORT
              value: "80"
            - name: HOST
              value: "0.0.0.0"
            - name: ENABLE_TRUST_PROXY
              value: "true"
            - name: HOSTNAME_OVERRIDE
              value: "10.0.25.62"
            - name: DB_CONNECTION_STRING
              value: "mongodb://root:example@courselit-mongo-svc:27017/medialit?authSource=admin"
            # S3 Config (Pointing to MinIO VM)
            - name: CLOUD_ENDPOINT
              value: "http://10.0.30.12:9000"
            - name: CLOUD_ENDPOINT_PUBLIC
              value: "http://10.0.30.12:9000/"
            - name: CDN_ENDPOINT
              value: "http://10.0.30.12:9000/courselit-media"
            - name: CLOUD_REGION
              value: "us-east-1"
            - name: CLOUD_KEY
              value: "your_access_key_minio"
            - name: CLOUD_SECRET
              value: "your_secret_key_minio"
            - name: CLOUD_PUBLIC_BUCKET_NAME
              value: "courselit-media"
            - name: CLOUD_BUCKET_NAME
              value: "courselit-media-private"
            - name: CLOUD_FORCE_PATH_STYLE
              value: "true"
            - name: CLOUD_PREFIX
              value: "media"
            - name: EMAIL
              value: "youremail@gmail.com"
            - name: TEMP_FILE_DIR_FOR_UPLOADS
              value: "/tmp"
          ports:
            - containerPort: 80
Medialit requires S3-compatible storage and needs two buckets: a private bucket and a public bucket. These are courselit-media and courselit-media-private, respectively. You also need to ensure that the public bucket is publicly accessible.
As I mentioned, I have my own S3 instance using Minio. Whether you use a self-hosted S3 instance or AWS S3, you need to generate an access key and secret to allow Medialit to access the instance.
After deploying Medialit, it will generate a key MEDIALIT_APIKEY that you’ll see in the log and that you’ll use so that Courselit knows how to communicate with Medialit; the other environment variables are self-explanatory4.3.7 Medialit Service
Like other deployments, Medialit needs a service to communicate with the other components, but this service will be a bit different. To put it simply, it will be a service associated with a static IP address, which will allow you to access Medialit via an IP address rather than using the service name.
apiVersion: v1
kind: Service
metadata:
  name: medialit-lb
  namespace: courselit
  annotations:
    metallb.universe.tf/loadBalancerIPs: 10.0.25.62
spec:
  type: LoadBalancer
  externalTrafficPolicy: Local
  selector:
    app: medialit
  ports:
    - name: http
      port: 80
      targetPort: 80
      protocol: TCP
Note : I’m not sure why, but in my deployment, I couldn’t get Medialit and Courselit to work using the service name.
And to ensure this service works, make sure you have metallb installed in your Kubernetes cluster.
4.3.8 Medialit & Courselit
In the Courselit deployment shown earlier, the setup was very minimalistic—there was no indication of where Courselit called the Mediality API. I simplified it for the sake of simplicity, as Courselit needs the Medialit API key to communicate with it. Here is a complete version of the Courselit deployment capable of communicating with the other components.
apiVersion: apps/v1
kind: Deployment
metadata:
  name: courselit
  namespace: courselit
spec:
  selector:
    matchLabels:
      app: courselit
  template:
    metadata:
      labels:
        app: courselit
    spec:
      containers:
        - name: courselit
          image: codelit/courselit-app:latest
          ports:
            - containerPort: 3000
          env:
            - name: NODE_ENV
              value: "production"
            - name: PORT
              value: "3000"
            - name: SITE_URL
              value: "https://yourdomain.com"
            # Mongo
            - name: SUPER_ADMIN_EMAIL
              value: "yourmail@gmail.com"
            - name: DB_CONNECTION_STRING
              value: "mongodb://root:example@courselit-mongo-svc:27017/courselit?authSource=admin"
            - name: AUTH_SECRET
              value: "your_secret_auth_ici"
            # Mail
            - name: EMAIL_HOST
              value: "smtp.gmail.com"
            - name: EMAIL_PORT
              value: "465"
            - name: EMAIL_USER
              value: "yourmail@gmail.com"
            - name: EMAIL_PASS
              value: "your pass"
            - name: EMAIL_FROM
              value: "yourmail@gmail.com"
            # Media (Internal Load Balancer IP)
            - name: MEDIALIT_SERVER
              value: "http://10.0.25.62"
            - name: MEDIALIT_APIKEY
              value: "your_medialit_apikey_ici"
            # Queue (Internal Service DNS)
            - name: QUEUE_SERVER
              value: "http://courselit-queue-svc"
            - name: COURSELIT_JWT_SECRET
              value: "your_secret_auth_ici"
          volumeMounts:
            - name: next-cache
              mountPath: /app/apps/web/.next/cache
      volumes:
        - name: next-cache
          emptyDir: {}
As you can see, the variable QUEUE_SERVER specifies the address of the Courselit queue, and MEDIALIT_SERVER and MEDIALIT_APIKEY allow Courselit to communicate with Medialit.
5. Courselit Accessible Online
There are several options you can use to make your Courselit instance accessible online. If you’ve deployed it using well-known solutions like DigitalOcean or AWS, the process is straightforward. But if, like me, you’re running a home lab, you can use an ingress controller. In my case, I used Traefik with a Cloudflare tunnel pointing to my home lab
Here we have an architecture that’s more or less ready to be deployed on K8S.
Note : The complete manifest file is available here; you can modify it with your own configuration before applying it.
6. Summary
Self-hosting Courselit on Kubernetes is more than just a technical challenge—it’s a statement about digital sovereignty. While the platform is still growing and lacks some bells and whistles like native comments or deep analytics, the trade-off is worth it. You get a robust, scalable LMS without the 'SaaS tax.'
What makes Courselit truly stand out isn't just that it's free, but the absolute freedom it provides. Unlike platforms that take a percentage of your sales or dictate how you should structure your school, Courselit gives you the keys to the kingdom. It’s lightweight, incredibly fast, and follows a 'privacy-first' approach. By self-hosting, you aren't just a user; you are the owner of your platform, your database, and your community’s data.
If you don't want to bother with all the configurations I've explained in this article, you can always sign up for a Courselit and Medialit subscription, which are offered at a fairly reasonable price compared to the competition.
If you have questions don't hesitate to ask question in the comments below.
7. References






 ericampire